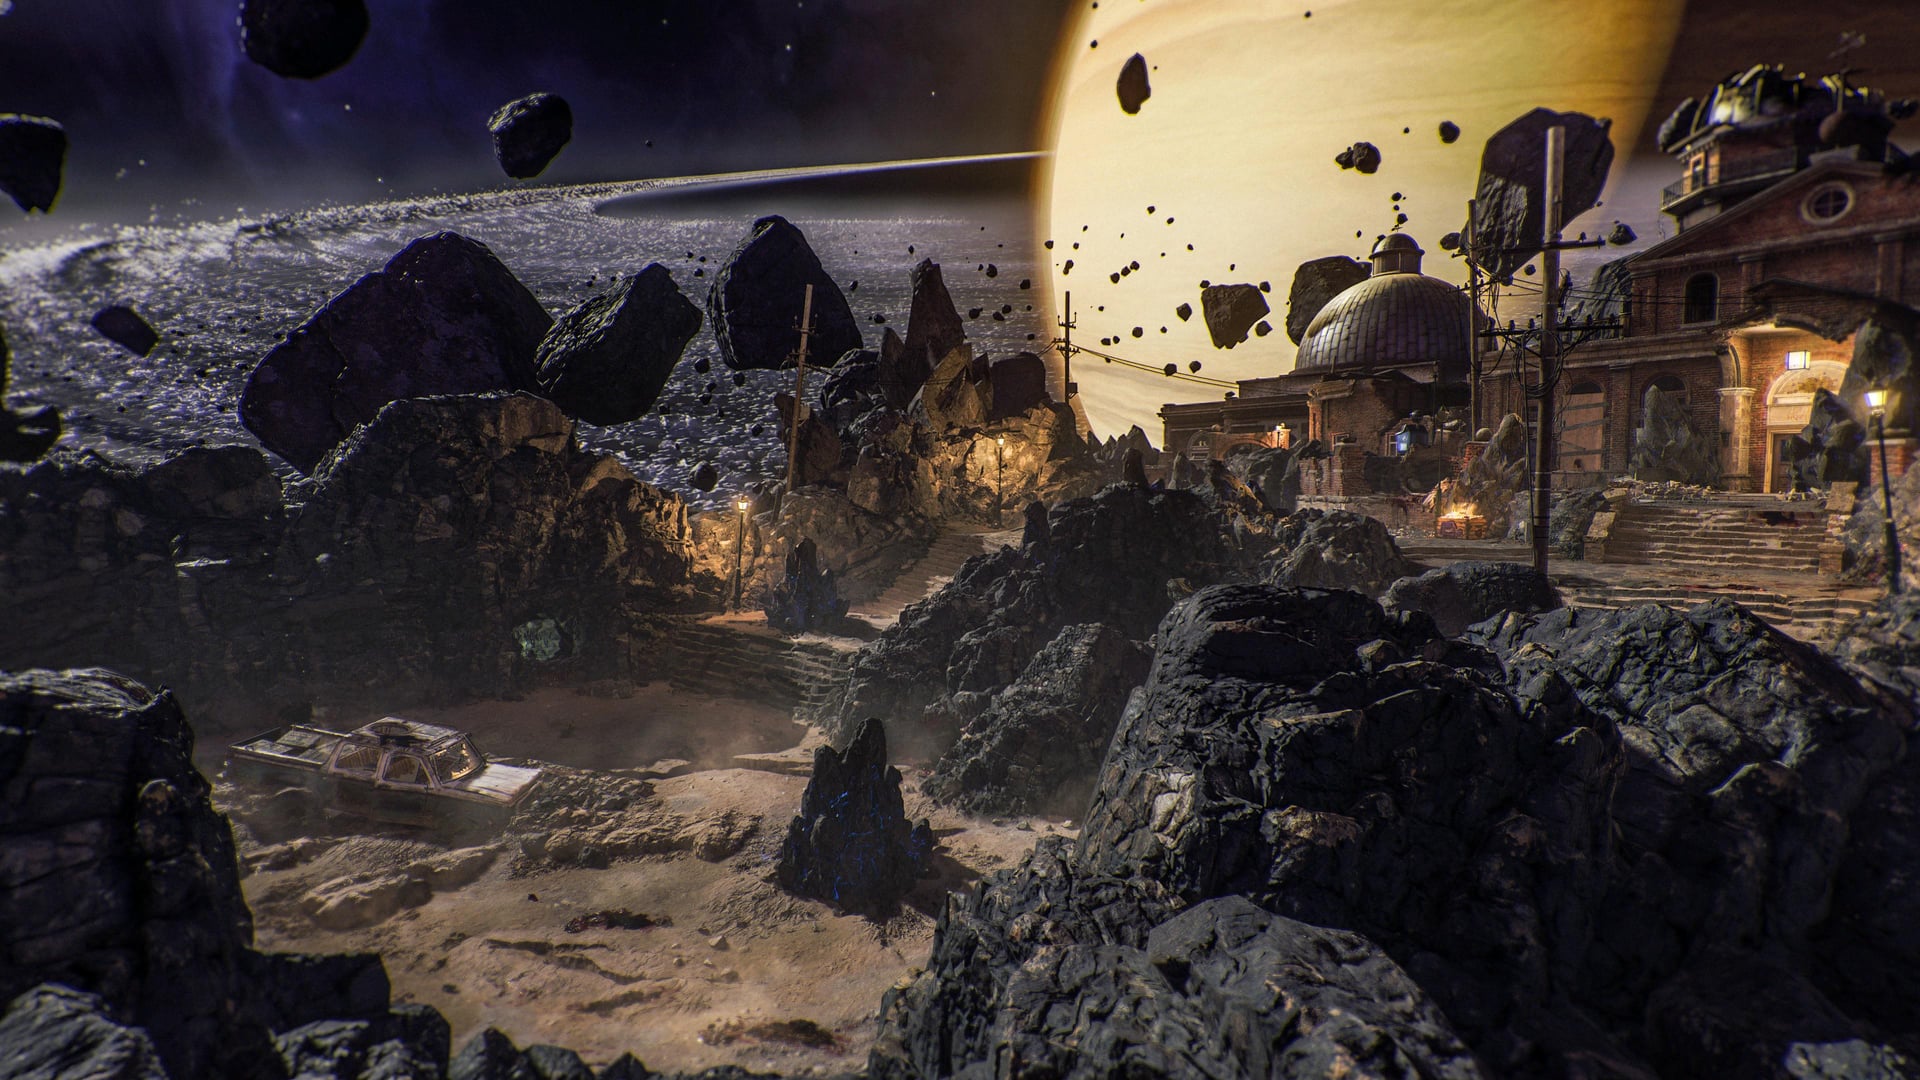
In the cold depths of space, a century-old observatory guards a gateway to a dead world. Awaken the astronomer, defeat the mechanical guard, and liberate the celestial Shadowsmith!
Key Features
This is a walkthrough of the key features of the map, such as Pack-a-Punch, Wonder Weapons, etc.
- TBD
- Collect several items:
- Destroy one of O.S.C.A.R. flying drones to obtain the Damaged Drone.
- Find a blinking lamp post around the map and shoot it to drop the Aberrant Wiring.
- Equipped with a Pack-a-Punched gun, shoot the gearbox of Ol' Tessie in Crash Site to collect the Car Battery.
- With Cryofreeze equipped, find and shoot an Aether Crystal around the map to drop an Absolute Zero Shard. You need to collect a total of 3 shards.
- Kill O.S.C.A.R. using three different traps. This can be done in any order, but only one can be done per round.
- Place the Absolute Zero Shard inside the rocket thrusters in Museum Infinitum. If done correctly, a countdown will be heard. Activate the trap and bring O.S.C.A.R. to the rocket thrusters to kill it.

- Place the Damaged Drone, Car Battery and Aberrant Wiring inside the trap at the Luminarium to enable the Electro-Volt Projector. Bring O.S.C.A.R. inside the room and interact with the trap to kill it. Players have to hold O.S.C.A.R. within the room until it overheats and explodes. Purple-eyed zombies will also spawn during this step.
- Inside the Observatory Dome, find and shoot at 5 fuming valves around the room within a limited time. If done correctly, the telescope will start moving.
- Two are located above the telescope.
- Two are located under the telescope.
- Three are located on the walls inside the room.
- One is located on a pillar behind a sparking box.
- One is located in the small room when coming from Machina Astralis
- Bring O.S.C.A.R. beneath the telescope and interact with the organ in front of the Pack-a-Punch machine. A screen will appear and you'll need to place the cursor on the Sun to activate the trap. Make sure O.S.C.A.R. stays within the laser beam to kill it.
- Place the Absolute Zero Shard inside the rocket thrusters in Museum Infinitum. If done correctly, a countdown will be heard. Activate the trap and bring O.S.C.A.R. to the rocket thrusters to kill it.
- Once all three traps are done, the final O.S.C.A.R. killed will drop the LGM-1.
Leads
- The Stellar Dissector can be found next to the trap in Luminarium
- 5 Grandfather clocks can be meleed to pixelate your vision and slow down time.
Main Quest
- Acquire the LGM-1 (see Key Features for the full trap sequence).
- Starting at Round 10, stay behind O.S.C.A.R. and follow it until it plays a recording, during which Dr. Thurston will recite the name of three planets. Turn the planets into numbers based on their distance from the Sun (Mercury = 1, Venus = 2, ... Neptune = 8).
Mars Code Open helper
Open full-page tool ↗Select the three planets from O.S.C.A.R.’s recording, in spoken order.
Observatory Dome terminal- —
- —
- —
This is the three-digit code by distance from the Sun. The telescope’s four-digit Mars DEC code is a separate step.
Saved on this device - Travel to the Observatory Dome and enter the 3-digit code into the terminal. If done correctly, a lift will drop down next to the Pack-a-Punch.
- Retrieve the key from the corpse on the lift, then travel to Machina Astralis and interact with the cryopod located in the adjacent room leading to Scholar’s Way. The pod will open, revealing Dr. Thurston’s corpse. Note that this will summon O.S.C.A.R. and spawn several zombies to your location.
- Travel to Museum Infinitum and find the Rock Saw located behind a glass display; shoot the glass to pick it up. Return to the cryopod and interact with the corpse to collect Thurston’s brain. You can pick up the Rock Saw before Step 4. Once the cryopod is opened, hold interact on Thurston’s head to collect his brain — you will be immune to damage during the process.
- Travel to The Luminarium and interact with the brain jar on the table to replace the monkey brain with Thurston’s brain. Interact once more, and this will trigger a short lockdown where you need to defend the brain.
- Pick the brain jar up and place it in the machine near the portal in Machina Astralis. Holding the jar will slow you down. Hold interact on the machine to connect the jar to it. If done correctly, the machine will power up and display a list of book titles on the left screen (9 possible titles).
- Go to the Archive of Orbis. Inside the room there are three busts, each with a set of 3 bookshelves beside it. Interacting with each bookshelf displays one of the book titles. Find the book titles shown by the machine, then as fast as possible, interact with each bust as many times as the number of matching titles found in its set of shelves. Example: if the machine shows The Black Veil, Echoes of Andromeda, Witchlight Codex, Silence at Singularity, interact with bust 1 once, bust 2 once, bust 3 twice.
Books & busts Open helper
Select the book titles on the machine’s reading list. Match busts to the bookshelves beside them.
Bust 1Bust 2Bust 3Bust 1: 0 (skip) · Bust 2: 0 (skip) · Bust 3: 0 (skip)Enter the counts promptly in bust order. Zero means no interaction.
Saved on this device - If done correctly, a panel will open above the ladder in the room. Climb it to retrieve the Neptune model and place it in the display at the top of Machina Astralis.
- Find three pages around the map; each page shows a random planet (e.g. Mars) and a random direction (e.g. NE): one on a table in The Luminarium (same room as the Stellar Dissector trap), one on a desk in Machina Astralis, one on the large table in Archive of Orbis.
- Shoot the corresponding planets (Mars, Saturn, Neptune) on the model display to align each in the direction from the notes. The compass showing the directions is below the Sun model.
Planet Sheets Map Open helper
Open full-page tool ↗Copy each planet’s direction from the three sheets.
Mars: Not recordedSaturn: Not recordedNeptune: Not recordedUse the compass below the Sun model to orient yourself. Shoot each planet into its recorded direction; planets can share a direction.
NWMarsSaturnNeptuneNMarsSaturnNeptuneNEMarsSaturnNeptuneWMarsSaturnNeptuneSunMarsSaturnNeptuneEMarsSaturnNeptuneSWMarsSaturnNeptuneSMarsSaturnNeptuneSEMarsSaturnNeptuneSheet locations
Luminarium desk · Machina Astralis table · Archive of Orbis large table.
Saved on this device - Travel to the Observatory Dome and interact with the telescope. Look for Mars and note its declination (DEC) — this corresponds to a 4-digit code.
- On the second floor of Machina Astralis, enter the code into the machine. If done correctly, Thurston will acknowledge the successful code input.
- Interact with the machine to reboot the portal. This spawns O.S.C.A.R., who constantly launches flying saucers at the portal to damage it. Destroy the saucers and defend the portal until it finishes rebooting — if it takes too much damage before the timer runs out, the step fails. If done correctly, you will be teleported to Mars automatically.
- While on Mars, pick up Thurston’s brain jar in the center of the arena and place it in the machine at the top of the stairs. Interact with it to create a portal. (Step 6 of the cheat sheet can be done as you create the portal.)
- Interact with the machine to play music (once per round). When the music plays, the Ascendant Eye will be seen flying near the giant head outside the map.
- Shoot the four pylons outside the map in order: Back Right, Back Left, Front Right, Front Left, then the pylon above the machine on top of the temple to bring the Ascendant Eye into the arena. Shooting the temple pylon repeatedly keeps the music playing, forcing the Ascendant Eye to stay.
- Wait for the Ascendant Eye to fly low in the arena, then jump and interact to grab it. Easier with low gravity enabled.
- Place the Ascendant Eye in the device on the right side of the arena. With the LGM-1, shoot the antennas on the five pillars around the arena — each plays a note and displays a symbol on its pillar.
- Back in the Observatory Dome, interact with the organ. The screen on the right displays the five symbols in order, with one hidden behind distorted wave lines. This step can be done immediately after unlocking Pack-a-Punch.
Harmonic Organ Order Open helper
Open full-page tool ↗Record all five positions from the organ screen. Put Static exactly where the distorted symbol appears.
Interact with the Mars pillars in this orderSelect four different symbols and one Static slot.
Symbol and pillar reference
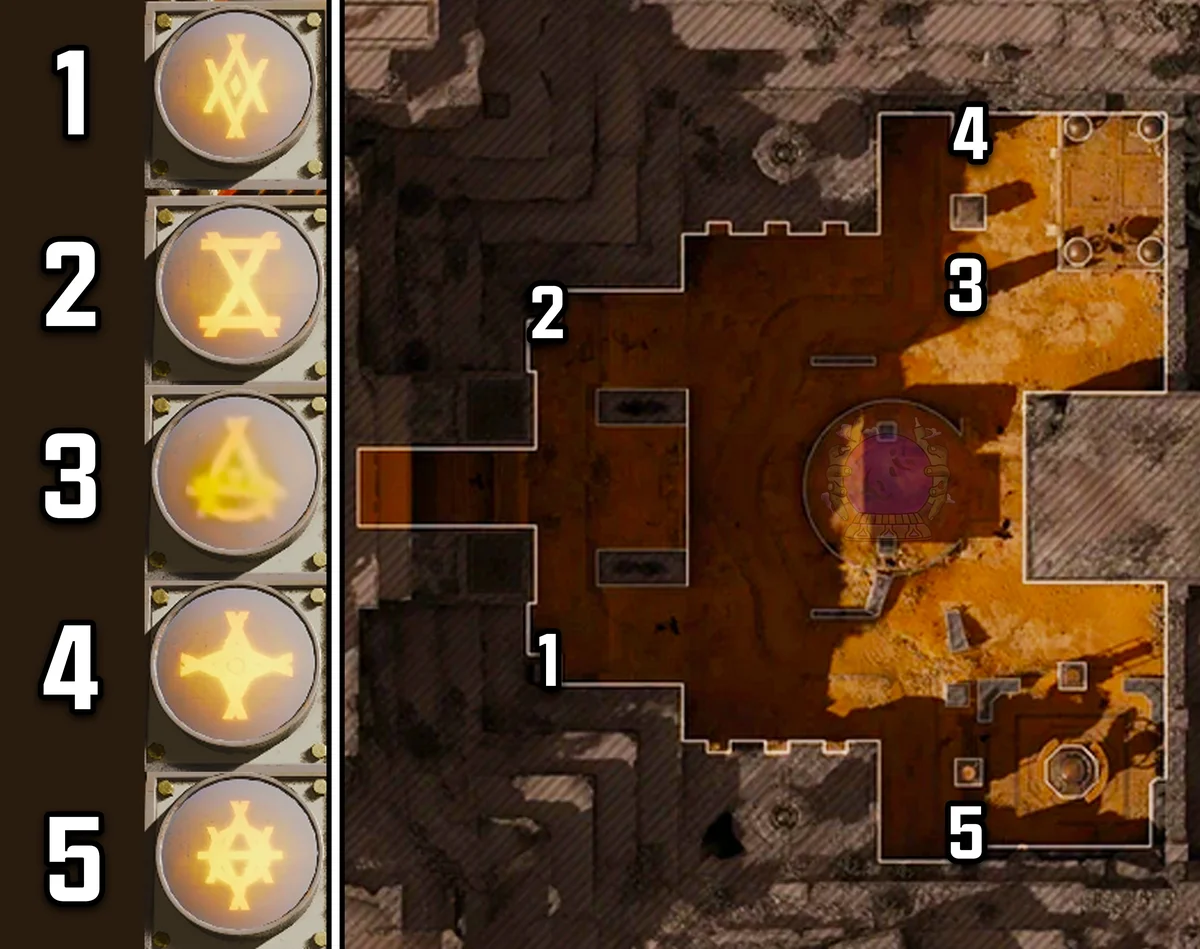
First activate the five pillar antennas with the LGM-1. Then interact with their symbols in the displayed order.
Saved on this device - Return to Mars and interact with the pillars in the order shown on the organ’s screen, inserting the missing symbol where indicated. If done correctly, the screen brightens and a quote from Thurston plays.
- Interact with the machine at the top of the stairs to start the fight against Caltheris.
- Phase 1 — Kill zombies while dodging Caltheris’s lasers to charge the Tesla coil on the right side of the arena. Once fully charged, interact with the machine at the top of the stairs to fire a beam, instantly draining 1/3 of her health bar. Repeat two more times. After each successful attack, Caltheris gains a new attack: meteors covering an area in flames, or toxic gas on the lower area (draining health to exactly 175 HP) while summoning toxic zombies.
- Phase 2 — Caltheris reforms into a smaller rock golem and chases you around the arena, slapping you into the air and throwing rocks. Damage her until a glowing blue weak point appears, then hit it for critical damage.
- Phase 3 — Caltheris Ascendant. She has an immunity period during which armored zombies spawn (restock on armor plates). Plays like phase 2 but adds a slam attack — jump into the air to avoid damage.
- Phase 4 — Caltheris the Needle. All attacks are empowered: rock throws create purple pools of electricity that deal heavy damage, movement speed increases exponentially, and the slam hits harder, stuns longer, and covers a wider area. Deplete her health bar to win.
- If you have completed the Ashes of the Damned main quest, Veytharion’s Blessing spawns at the top of the arena during this phase — it refills ammo/armor and grants infinite ammo and equipment for a limited duration.
Awaken the astronomer
- Acquire the LGM-1 (see Key Features).
- Starting at Round 10, follow O.S.C.A.R. until it calls out three planets. Convert planets to numbers by their distance from the Sun (Mercury = 1, Neptune = 8).
Mars Code Open helper
Open full-page tool ↗Select the three planets from O.S.C.A.R.’s recording, in spoken order.
Observatory Dome terminal- —
- —
- —
This is the three-digit code by distance from the Sun. The telescope’s four-digit Mars DEC code is a separate step.
Saved on this device - Enter the 3-digit code at the Observatory Dome terminal; a lift drops with a corpse and a key.
- Go to Machina Astralis, open the cryopod with the key to reveal a corpse.
- Shoot the glass at Museum Infinitum to grab the Saw, return to the pod, and take the brain.
- Place the brain on the table in the Luminarium and defend during the short lockdown.
- Bring the brain to the machine near the teleporter in Machina Astralis to power it; it will list book titles.
Power and align the observatory
- Use the Observatory Dome telescope (requires trap activation or LGM-1) to find Mars coordinates (4-digit code).
- Enter the code at the Machina Astralis machine; it confirms Mars.
- In Archive of Orbis, match the three busts to the counted book titles from their shelves (do this at round start for time).
Books & busts Open helper
Select the book titles on the machine’s reading list. Match busts to the bookshelves beside them.
Bust 1Bust 2Bust 3Bust 1: 0 (skip) · Bust 2: 0 (skip) · Bust 3: 0 (skip)Enter the counts promptly in bust order. Zero means no interaction.
Saved on this device - When correct, climb the opened panel to grab the Neptune model and place it atop Machina Astralis.
- Collect three planet notes (directions + planet): Luminarium desk, Machina Astralis table, Archive of Orbis table.
- Align the planets on the model display to the noted directions (compass around the Sun model).
Planet Sheets Map Open helper
Open full-page tool ↗Copy each planet’s direction from the three sheets.
Mars: Not recordedSaturn: Not recordedNeptune: Not recordedUse the compass below the Sun model to orient yourself. Shoot each planet into its recorded direction; planets can share a direction.
NWMarsSaturnNeptuneNMarsSaturnNeptuneNEMarsSaturnNeptuneWMarsSaturnNeptuneSunMarsSaturnNeptuneEMarsSaturnNeptuneSWMarsSaturnNeptuneSMarsSaturnNeptuneSEMarsSaturnNeptuneSheet locations
Luminarium desk · Machina Astralis table · Archive of Orbis large table.
Saved on this device - Return to Machina Astralis, interact with the brain to reboot the portal, defend against O.S.C.A.R.; you will be sent to Mars.
Mars sequence
- Pick up the brain at the arena center, place it in the machine up the stairs, and create the portal.
- Each round, play the machine sound to spot the ascendant eye; while it flies, shoot pylons: Back Right > Back Left > Front Right > Front Left > temple pylon above the machine. Grab the eye when it dives.
- Place the ascendant eye in the device on the right side of the arena (facing where you shot pylons).
- With the LGM-1, shoot the antennas of the five arena pillars until each shows a symbol and a song plays.
- Back in Observatory Dome, read the organ screen: it shows the five symbols in order with one missing (denoted by wavy lines). Note the missing symbol and its position.
Harmonic Organ Order Open helper
Open full-page tool ↗Record all five positions from the organ screen. Put Static exactly where the distorted symbol appears.
Interact with the Mars pillars in this orderSelect four different symbols and one Static slot.
Symbol and pillar reference
First activate the five pillar antennas with the LGM-1. Then interact with their symbols in the displayed order.
Saved on this device - Return to Mars and interact with the pillars in that exact order, inserting the missing symbol where indicated.
- Interact with the machine atop the stairs to start the fight against Caltheris.
Caltheris Boss Fight — Overview
- Kill zombies while dodging lasers to charge the Tesla coil on the right side of the arena.
- Once charged, interact with the machine at the top of the stairs to fire a beam that drains 1/3 of her health bar.
- Repeat on the left side. Lava orbs leave burning pools on the floor.
- Each successful beam adds a new attack: meteor strikes that set an area on fire, or toxic gas on the lower area (drains you to exactly 175 HP) plus toxic zombies.
- Caltheris reforms into a smaller rock golem that chases you, slaps you into the air, and throws rocks.
- Damage her until a glowing blue weak point appears, then hit it for critical damage.
- Keep kiting zombies while bursting the weak point.
- She gains an immunity period during which armored zombies spawn — restock on armor plates.
- Plays like phase 2, with a slam attack added: jump as the slam lands to avoid the shockwave.
- All attacks are empowered. Rock throws leave purple pools of electricity that deal heavy damage.
- Movement speed increases exponentially; the slam hits harder, stuns longer, and covers a wider area.
- Deplete her health bar to finish the fight.
- If you completed the Ashes of the Damned main quest, Veytharion's Blessing spawns at the top of the arena — it refills ammo/armor and grants infinite ammo and equipment for a limited time.
Side Quests and Easter Eggs
Find three Mr Peeks headphones around the map:
- At the bottom shelf, left of the exit door in Luminarium
- On a display case in Machina Astralis
- On the ground next to a wall in Mars
By Avenged Sevenfold
- Inside a wooden box in Machina Astralis in a box on the middle floor
- At the top of a bookshelf in the Luminarium
- On a wooden sil above a zombie spawner in the Museum
Bring the records to gramophone in the Luminarium and it will play the Game Over song from Alpha Omega.
Look for glowing eyes in zombie spawners around the map and throw a shiny trinket at them; the Ravager will eat the trinket and later reappear in another zombie spawn. Repeat this process twice more, and on the third time he will jump out, clap his cymbals together, and become a temporary friendly Ravager.
Find three Mr Peeks headphones around the map:
- At the bottom of the bookshelf, left of the door in The Luminarium going to Abyssal Rim.
- In a display case in Machina Astralis.
- On a chair in Observatory Dome.
"Magic" by Avenged Sevenfold
- Play as Nikolai Belinski.
- Travel to the lower part of Abyssal Rim, and throw a Molotov Cocktail on the ground near the Ammo Cache. This will create fiery footprints forming a trail. Throw additional Molotov Cocktails and follow the footprints until they reach an inaccessible cave.
- Interact with the toy near the cave to trigger a cutscene.
- After the cutscene, you will be teleported into the cave. Travel through the cave until you find an altar. Interacting with the altar will spawn Ravagers. Kill all the Ravagers until another cutscene is played.
- Once done, you will be back into the map. Loot will drop on the ground including a Molotov Cocktail and a Legendary Echo 12. Completing the side quest also rewards the "Echoes of the Damned" Dark Ops Calling Card.
- Get a Pack-a-Punched Weapon.
- Find 5 skulls around the map and shoot each one to light the eye sockets, then interact to pick them up:
- In the courtyard between Crash Site and The Luminarium.
- In one of the displays in Museum Infinitum.
- In a zombie spawn hole next to the Ammo Cache in Stargazer's Courtyard.
- In a display case in Machina Astralis on the left side when coming from Stargazer's Courtyard.
- In a corner behind the brick wall in The Veilwalk on the right side when coming from Archive of Orbis.
- Once all the skulls are collected, place them on the cabinet with the large mirror in Machina Astralis.
- All the skulls' eye sockets will shine and activate a Simon Says mini-game. Shoot the skulls in the correct order.
- If done correctly, all the skulls will float and merge into a Random Perk Power-Up.
- When defeating O.S.C.A.R., it will drop a toy robot called "Shiny Trinket" which will replace your Tactical when picked up.
- Find a white dot on the minimap, located outside the playable area and usually a place where zombies will spawn.
- Travel to that location, and you should find a green-eyed Ravager. Throw the Shiny Trinket at it. The Ravager will eat it and hide away.
- Repeat the process two more times.
- On the third time, the Ravager will jump into the map as "Bongo" and play with cymbals before attacking enemies for a few rounds.
Three gramophones can be found around the map. Each gramophone needs a corresponding vinyl record. While the records are playing, you need to complete a challenge.
- Archive of Orbis (near Stamin-Up): The record can be found inside a wooden box in the middle floor of Machina Astralis. While the song is playing, kill 5 zombies with equipment. Once the music stops, Equipment and a Mystery Perk can will drop.
- The Luminarium (near Mr Peeks headphone): The record can be found at the top of a bookshelf, next to one of the grandfather clocks. While the song is playing, kill 15 zombies with Field Upgrades. Once the music stops, Essence and a Mystery Perk can will drop.
- Museum Infinitum (near Speed Cola): The record can be found on the capital of the wooden pillar above a zombie window. While the song is playing, kill 5 zombies with melee weapons. Once the music stops, Salvage and a Mystery Perk can will drop.
- During a special round, travel to Museum Infinitum and interact with the left-most display cabinet beneath the painting of a mansion/castle.
- During the next rounds, weird noises will play from one of the displays in the museum, one per round and four times in total. Interact with each display.
- If done correctly, the ghost twins will appear somewhere around the map. They can be found in three states: dancing which plays music; drawing with chalk on the ground; standing holding hands. The Twins can appear in:
- Crash Site: Behind Ol' Tessie.
- The Luminarium: Inside the Stellar Dissector or in a corner outside on the Abyssal Rim side.
- Abyssal Rim: Next to Wisp Tea.
- Observatory Dome: In a corner near the X9 Maverick wall-buy.
- The Veilwalk: Next to the door leading to Observatory Dome.
- Machina Astralis: On the upper floor or in a corner near the door leading to Scholar's Way.
- Museum Infinitum: In a corner near the door leading to Scholar's Way.
- Once you come across the Twins, they will disappear leaving loot behind including Salvage and Equipment and a free Cryo Freeze Ammo Mod the first time they are encountered. The Twins will reappear every subsequent round giving additional loot.
- Rapidly melee 5 grandfather clocks found around the map:
- One in The Luminarium, next to the bookshelves.
- One in Museum Infinitum, near Speed Cola.
- Two in Machina Astralis: one on the bottom floor, one on the middle floor.
- One in Archive of Orbis, next to Stamin-Up.
- If done correctly, all the enemies will move slowly for 60 seconds. This can be repeated once per round.
- There are 9 lanterns against walls around the map:
- Two in Crash Site.
- Three in the courtyard in front of The Luminarium.
- Two in the back of The Luminarium.
- Two in Scholar's Way.
- Find the lantern that is shining with a white wisp. Aim at the lantern to obtain the wisp inside. The wisp will now orbit around you. Using your melee button will throw the wisp before it comes back to you. When thrown at zombies, the wisp will usually kill 1 or 2 zombies. Killing zombies with the wisp does not give any Essence.
- To upgrade the wisp, place it inside all the 9 lanterns by throwing it then getting it back by aiming at the lantern.
- Once the wisp is in the last lantern, pass the round. If done correctly, the wisp will now turn yellow/orange. The wisps will also be available from any lantern.
- You can collect up to 5 wisps at a time, which will orbit around you. Each upgraded wisp can kill about 5 zombies.
- Starting at Round 16, the rocket from Ashes of the Damned will be seen floating in front of Saturn. Hit the rocket by throwing an upgraded wisp. If done correctly, the wisp will come back and drop a Ray Gun.
- Additionally, aiming at the rocket long enough will play the song "Once In A Blown Up Moon" by Brian Tuey.
- In the area near Wisp Tea machine, an asteroid can be located nearby. Throw a grenade at the asteroid so that its explosion will knock the asteroid closer to you.
- Sprint and wall jump to the left side of the asteroid. If done correctly, you will float into space and travel back to the Crash Site. As you travel, the DG-2 Turret will spawn; interact with it as you pass to grab it. While you travel a new mix of "Pareidolia" by Brian Tuey will play.
- Once back at the Crash Site, install the turret onto Ol' Tessie. The turret can be used freely and is effective against O.S.C.A.R.
- Reach Mars and activate the portal.
- Aim at the giant statue head on the right side of the stairs, when viewed from the portal entrance.
This will play a remastered version of Pareidolia.
- Move the telescope as part of the steps to unlock the LGM-1.
- Interact with the binoculars on the left side of the organ and bring the cursor to the small-sized skull located at RA 2h 23m and DEC 42° 21'.
- If done correctly, a short skull jumpscare should be triggered before forcing you out of the screen. The skull is gone afterwards.
Six Relics modify Cursed Mode in Astra Malorum (two per tier). Effects and unlock steps are still undiscovered; use the placeholders below until they are found.
The Relics are divided into three groups: Grim, Sinister, and Wicked. Each fills the Cursed Tier bar differently (Grim ≈ 1, Sinister ≈ 2, Wicked ≈ 3). Mix combinations to reach the tier you want:
- Tier I: Any 3 Grim — Unlocks Golden Armor (45,000 Essence)
- Tier II: 2 Sinister + 2 Grim (example) — Unlocks Ultra Rarity
- Tier III: 3 Grim + 2 Sinister + 1 Wicked (example) — Unlocks Pack-a-Punch IV (100,000 Essence)
Higher tiers just need the total difficulty value to match the target fill; swap relics as you discover them.
Grim Relics
- Have Tesla Storm as your Field Upgrade, and at least one weapon with Dead Wire.
- Starting at Round 20, and every round afterwards, a zombie will spawn with a lightning rod embedded into its body.
- Around the map, there will be three doorways with a light bulb above them: The Luminarium (near the brain jar), Observatory Dome (near the room with the portal), and Archive of Orbis (next to the portal room).
- Bring the zombie with the lightning rod below the bulb and activate Tesla Storm. Then shoot the zombie to electrocute it with Dead Wire. If done correctly, the electricity will travel to the light bulb.
- Once all three are done, look for the green portal outside between Observatory Dome and Stargazer's Courtyard.
- Survive 4 waves where zombies can only be damaged with electric damage. Klaus Cores will also spawn there.
- Reach Round 20.
- A pistol will spawn on the ground somewhere on the map.
- Pick the pistol and kill the exact number of enemies as the round you are in (Round 21 = 21 kills, etc). Once it is done, pass the round using any other weapon. Otherwise, start again the next round. The pistol can be Pack-a-Punched and its rarity can be upgraded.
- Travel to Observatory Dome and interact with the green portal to start the Relic Trial.
- Survive 4 waves with only a Pack-a-Punched pistol.
Sinister Relics
- Activate Cursed Mode Tier I.
- Reach Round 40 and defeat O.S.C.A.R. with a melee weapon while Wisp Tea spirit is attacking it. O.S.C.A.R. can be damaged with other way but the killing blow needs to be done with a melee.
- Travel to Archive of Orbis and interact with the yellow portal to start the Relic Trial.
- Survive 5 waves while all perks are disabled.
- Activate Cursed Mode Tier I.
- Open the portal to Mars and reach Round 40.
- Place a C4 on each of the three gut piles found on the central platform on Mars.
- Gather a group of zombies in the middle of the platform and detonate the C4. If done correctly, Mr Peeks will be heard laughing.
- Travel to the side room of Machina Astralis and interact with the yellow portal to start the Relic Trial.
- Survive 5 waves while zombies and HVTs can only be killed with Field Upgrades.
Wicked Relics
- Activate Cursed Mode Tier II.
- Open the portal to Mars and reach Round 60.
- Get a Mangler Cannon and travel to Mars. Shoot the portal with the Mangler Cannon, then teleport back to Machina Astralis.
- After a few seconds, the shot from the Mangler Cannon will leave the portal going towards Archive of Orbis. You need to gather a group of zombies inside the red circle on the ground near the portal, using Decoys for example.
- If enough zombies were killed, a red portal will appear on a wall at Crash Site. Interact with it to start the Relic Trial.
- Survive 6 waves while zombies and HVTs only take damage from hip-fire.
- Activate Cursed Mode Tier II.
- Reach Round 60 and make sure to have PhD Flopper.
- Get Energy Mine and trigger a mine next to Ol' Tessie. If done correctly, the headlights will flash three times signaling the start of a sequence. Afterwards each of the headlights and brake lights will light up. This will be the order for the chandeliers in Museum Infinitum.
- The two chandeliers near the doorway to Stargazer's Courtyard are the headlights, while the two chandeliers near the doorway to Crash Site are the brake lights.
- Wall jump to reach the chandeliers to put out the candles, in the order shown by Ol' Tessie.
- Travel to Crash Site and interact with the red portal to start the Relic Trial.
- Survive 6 waves by killing HVTs while all zombies are turned into sprinters.
Wall-Buys and Perk-a-Colas
| Jäger 45 | Crash Site |
| M34 Novaline | The Luminarium |
| Carbon 57 | Museum Infinitum |
| Akita | Machina Astralis |
| Shadow SK | Abyssal Rim |
| XM325 | Stargazer's Courtyard |
| X9 Maverick | Observatory Dome |
Mister Peeks · Cursed mode: Check his possible spawn locations. Shoot him when he appears to drop an egg that can contain perks and other loot.
Note: Der Wunderfizz appears after purchasing or acquiring 4 Perk-a-Colas.
| Juggernog | The Luminarium |
| Quick Revive | Crash Site |
| Mule Kick | The Veilwalk |
| Wisp Tea | Abyssal Rim |
| Speed Cola | Museum Infinitum |
| Stamin-Up | Archive of Orbis |
| Der Wunderfizz | Stargazer's Courtyard |
Miscellaneous Features
- TBD
Sources and review
Guide text is adapted from the r/CODZombies community wiki with AI assistance. The references below also informed the map and puzzle helpers. Source and software checks do not replace an in-game playthrough.