Key Features
Power, shield & Pack-a-Punch at Groom Lake
- Open Main Offices, ride the elevator down to the War Room, clear access to its lower elevator and descend to the laboratories. Turn on power in the South Laboratories room behind the Soda perk machine. Gather the three shield pieces while opening the floors, then build the Riot Shield at Weapon Testing if you plan to attempt round 150.
- Gun assembly: Central Filing near filing cabinets; teller/Side Passage window; left of Main Offices entrance.
- Base: lower War Room by Server Room doorway/computers; under stairs; behind the Mystery Box position.
- Window: South Laboratories left of power; left of the teleporter near Weapon Testing; North Laboratories beside the barrier near Auger.
Central Filing is another valid shield bench. Weapon Testing is recommended because the endurance strategy depends on replacing it without leaving the camping position.
- Collect the Teleporter Signal Amplifier’s pad from Main Offices and its wires from Morgue. For the third part, raise DEFCON to 5 by flipping four switches: two on the upper War Room balcony, one on the lower floor near the lab elevator, and one in Server Room. Before the amplifier is installed, the central War Room teleporter takes you to Panic Room; collect the amplifier there.
- Pad: beneath desk near Offices teleporter; on fallen desk near Mystery Box; beside Brew machine.
- Wires: chair near Morgue Mystery Box; countertop corner; open body chamber.
- There are four switches total. Normal Pack-a-Punch access accepts any order; the Kino clue later requires a particular order.
- Craft the amplifier at an available workbench and place it on the small teleporter base in the lower War Room. Set DEFCON 5 again, then use the large central teleporter to travel to Groom Lake for Pack-a-Punch. After installation, the Server Room teleporter is the route back to Panic Room when DEFCON is 5.
Install the amplifier at this small lower War Room pad Use the Server Room teleporter to revisit Panic Room after installing the amplifier
Weapon Quest
Project Skadi — reveal four pictured codes
- For this reward quest, bring Frag Grenades for the laboratory clue and a Pack-a-Punched gun for the nameplates. Acid Bombs are another documented explosive option. If your loadout has Wraith Fire, Pack-a-Punch the War Room Trebuchet and use its explosive shot behind the target machinery instead.
The Mystery Box can also give Winter’s Howl. Choose the free quest for a guaranteed route and Cold War Remedy; simply receiving the box weapon does not complete Project Skadi.
- Collect the four codes in whichever travel order suits your run. Save each code under its picture, including any initial zero. The sections below explain the exact reveal actions; their collection order does not change the machine’s required entry order.
- Der Riese: take the small key from the wall lockbox opposite Cola, near the lower War Room Panic Room door. Return upstairs to Main Offices and interact with the desk in the center. Read the four digits on the Der Riese photograph inside the opened drawer.
Der Riese picture in the desk drawer; the digits in this screenshot are only an example - Shangri-La: with power on, find the South Laboratories barrier near Weapon Testing. Throw your explosive through the barrier so it detonates behind the large machine. A sound confirms the hit and a photograph appears on the right side of the window. Record that picture’s four digits.
Get the explosive behind this machine through the laboratory barrier Shangri-La code appears beside the barrier; record your own digits - Kino der Toten: after opening Pack-a-Punch, use this exact DEFCON order: upper War Room switch by Spitfire/farthest from the Offices elevator → Server Room switch → other upper War Room switch by Offices elevator → lower War Room switch by the Labs elevator. Take Server Room’s teleporter to Panic Room. Interact with the static TV at the front-left to expose the Kino photograph and digits.
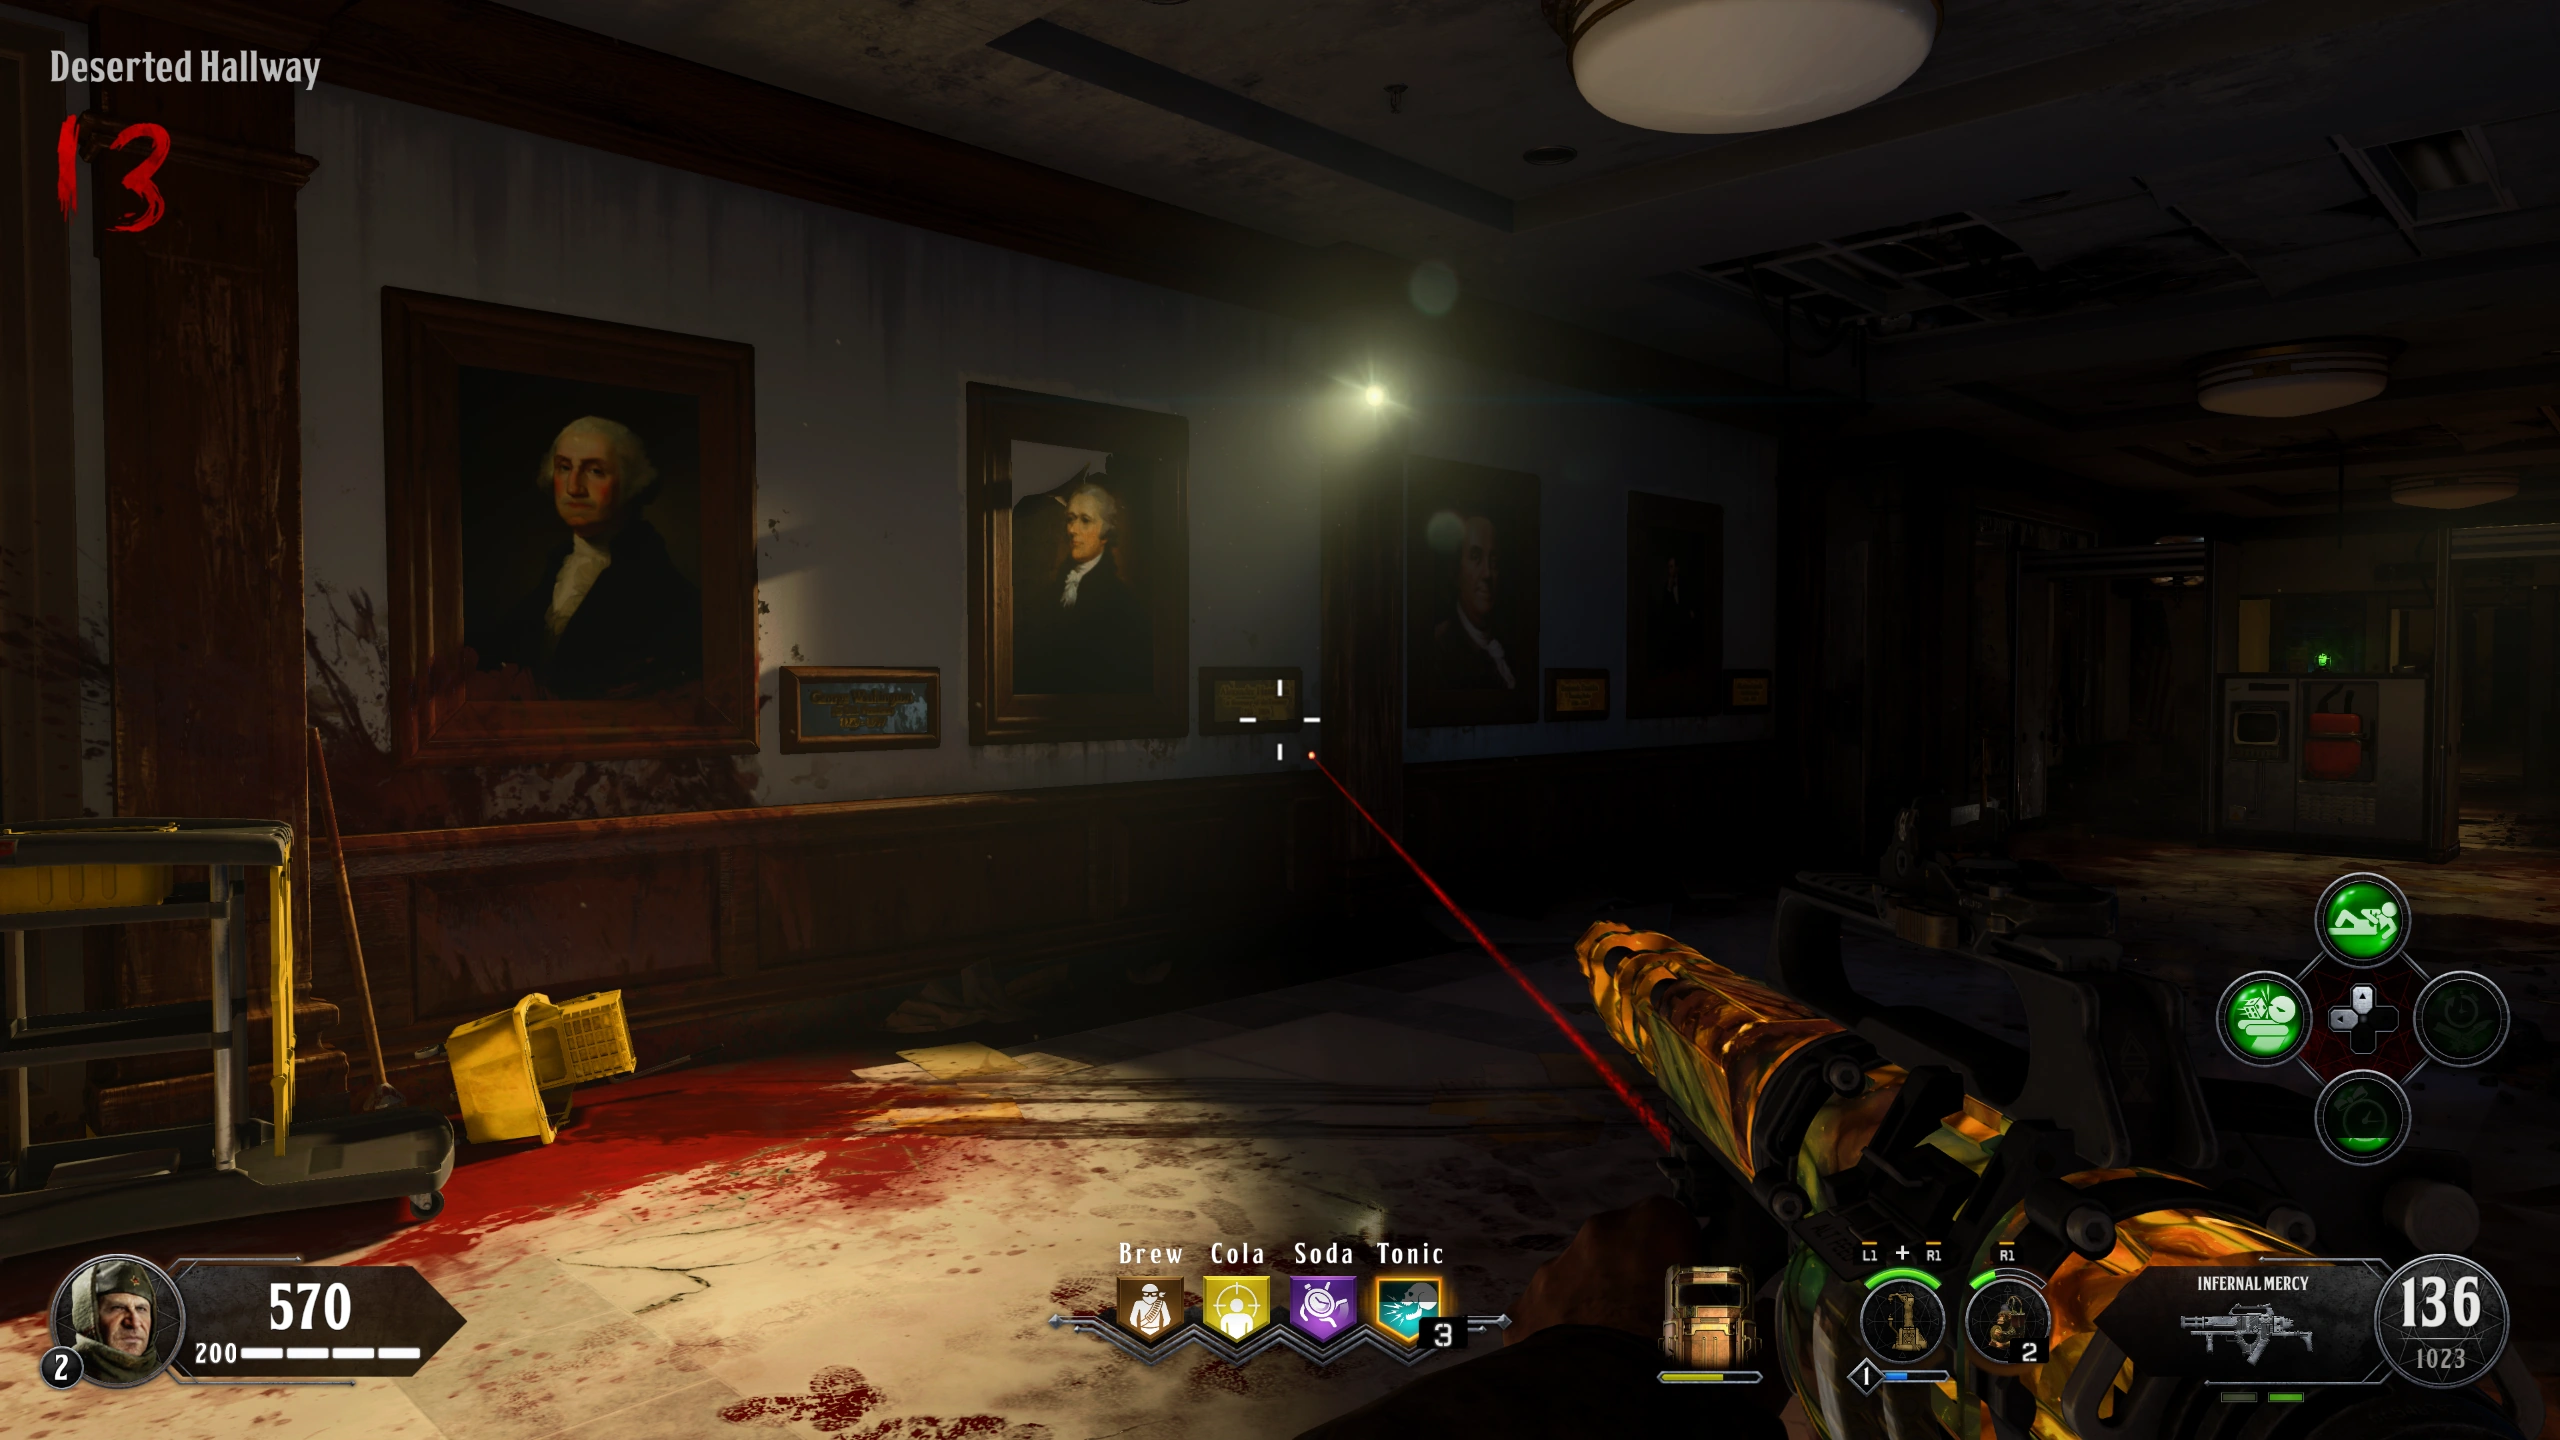
Kino photograph revealed under the moving Panic Room TV - Shi No Numa: use a Pack-a-Punched gun to shoot the nameplates below the four Deserted Hallway portraits, not the faces. The order is Washington → Franklin → Hamilton → Lincoln, or positions 1 → 3 → 2 → 4 when facing the row. Washington’s nameplate opens to show the Shi No Numa photograph and code.
Face the portraits: shoot nameplates in order 1, 3, 2, 4 Shi No Numa picture under Washington’s nameplate - At the lower War Room code machine, shoot the individual digits to match a recorded code, then press the button on the right. Submit in this order: Shi No Numa → Der Riese → Shangri-La → Kino der Toten. A green acceptance light confirms each. If an entry is wrong, restart the submission sequence from Shi No Numa; your collected clues remain useful.
Wait for both the announcer and the PROJECT SKADI RETRIEVED display after the fourth correct entry. Checking a box in the helper records your observation; it does not trigger the machine.
Set the machine’s digits by shooting, then use the right-side submit button - With Skadi retrieved, set DEFCON 5 and go to Groom Lake. Keep every player there for three full rounds; count rounds that begin and end while the whole team remains there. Leaving interrupts the stay. After the debris left of Pack-a-Punch moves, collect Winter’s Howl from the glowing case. Pack-a-Punch it normally to obtain Winter’s Fury.
Do not count a partly completed arrival round as a full round. The helper offers a manual full-round counter so a round change is not automatically mistaken for a completed requirement.
Project Skadi photo codes Open helper
The pictures below identify each clue. Their printed numbers belong to reference matches: enter the four digits from your own game.
1. Shi No Numa
Upgraded gun: shoot plates 1 → 3 → 2 → 4.
2. Der Riese
Take the War Room key; open the center desk.
3. Shangri-La
Explosive behind machinery; photo appears right of window.
4. Kino der Toten
DEFCON: upper far → Server → upper near → lower. Use Server teleporter.
Collect all four pictured codes; the screenshots show examples only.
Visual references: mmmrkennedy. Gameplay © Activision/Treyarch.
Story Ending
Round 150 — separate endurance ending
- The story cutscene triggers when round 149 is cleared and the match reaches 150. Project Skadi is optional for this objective. Recommended bench strategy: Victorious Tortoise, Stonecold Stronghold, Dying Wish and Timeslip in the modifier slot, with Ragnarok DG-5 and Wraith Fire. Build the shield in Weapon Testing and prepare a strong upgraded gun as backup.
If combining Skadi with Wraith Fire, use an upgraded Trebuchet for its explosive clue. That avoids choosing a grenade loadout solely for the shorter weapon quest.
- Stand in the Weapon Testing corner beside the shield bench with the shield raised. Use Wraith Fire and plant level-3 Ragnaroks as they recharge, then use the shield gun between those cycles. Watch both shield health and ammunition and buy a replacement before it fails. Keep enough points available for replacements and use the backup gun only when you have room.
Alternative: an upgraded Hellion with PhD supplies powerful splash damage, but has an ammunition dependency. A movement route using traps and Groom Lake’s cleared space avoids sitting at the bench; it needs more active positioning and resupply planning. The shield-bench loop is the recommended first attempt.
Recommended shield-bench position in Weapon Testing - Maintain the survival loop through the end of round 149. Treat shield replacements, perk recovery and pauses as part of an endurance run; the Skadi code tool does not count or complete it. When round 150 is reached, let the ending play.
Side Quests
Electric traps & more Groom Lake space
- Find one electric-trap component in Server Room and one in Porcine Research. Server Room spawns are beside its DEFCON switch, near the teleporter or left of the exit. Porcine spawns are beside the barrier left of KN-57, right of KN-57 or left of the exit. Install components in the metal-detector-style traps in Side Passage and Deserted Hallway.
- Remain at Groom Lake with all players for three full rounds to clear one debris section and reveal supplies. For another section, return to the Pentagon, revisit Groom Lake and complete another uninterrupted three-round stay. Up to seven sections can be cleared, giving you more movement space.
Songs, bonus enemies & audio
- Shockwave: interact with three bottles—on the Central Filing cabinet by the barrier, under the lower War Room console near the Skadi machine, and in the Porcine Research cabinet beside KN-57. Listen for each bottle’s clink.
- Intro song: interact with these terminals in order—lower War Room left of Server doorway; lower War Room near Labs elevator; Server Room opposite side of computer nearest DEFCON; lower War Room left of ICR-7; Server Room middle computer facing teleporter.
- For optional early points, repeatedly interact with the Main Offices door left of Brew, waiting for each McNamara line to finish. Samantha’s response starts a large Nova Crawler wave. Melee kills avoid their gas explosions and improve points, but start this only when the space is clear and you are ready for the extra enemies.
- For the punch-card audio, collect the Weapon Testing battery and install it in the Server Room reader; activate it with a Kill-O-Watt upgraded gun. Collect cards in Central Filing, Server Room, Panic Room, Weapon Testing, upper War Room, Main Offices and Groom Lake, then insert them into the room’s central terminal.
Sources and review
Source-checked against the linked community and illustrated guides. This revision has not been verified in a fresh complete in-game run. Screenshots show reference matches; always record your own clues.
Select any reference image to enlarge it. Screenshot and symbol sources are credited in the linked walkthroughs; this guide uses local copies for reliable access.