Key Features
Power, Pack-a-Punch and the free D.I.E.
- From Yard, open Nacht and the Crash Site route, enter the Tunnel and follow the purple arrows through the facility to Main Power. Press the red button, activate both Particle Accelerator terminals and enter the anomaly below. In the Dark Aether, follow the marker to the surface Aether Tunnel, pay to enter it and pick up the Machine Part in the otherwise sealed room. Return it to the ghostly Pack-a-Punch frame in the accelerator.
Pack-a-Punch and weapon rarity are separate upgrades. Use the Arsenal for armor and rarity; use Pack-a-Punch for damage tiers and ammo mods. The Dark Aether visit is timed, but you can re-enter if you run out of time.
- Kill a Megaton and both split enemies, then collect the dropped Keycard. Insert it in the Weapons Lab weapon locker and take the D.I.E. Remote Control. In Nacht’s Living Room, interact through the cracked wall beside the locked small room. Lead a group of ordinary zombies across the door’s suction beam until the device announces a full charge.
If the trap times out, wait for its short cooldown and activate it again. It retains collected souls. Stay out of the beam and clear enemies approaching from behind.
Weapons Lab: insert the Keycard here and collect the remote Living Room: activate and discharge the D.I.E. through this opening - Interact through the wall again to discharge the charged weapon and blow the door open. Take the D.I.E. Shockwave from the skeleton inside. Primary fire blasts; alternate fire sucks in zombies and specific quest objects. A weapon from the box or Legendary Trials also works and skips this free acquisition route.
The D.I.E. can be Pack-a-Punched in the updated game. Old launch guides saying it cannot are outdated. A box/trials weapon does not skip the Aetherscope and diary requirements.
The free D.I.E. appears on the skeleton after the door is destroyed
Main Quest
Aetherscope, diary and three reflections
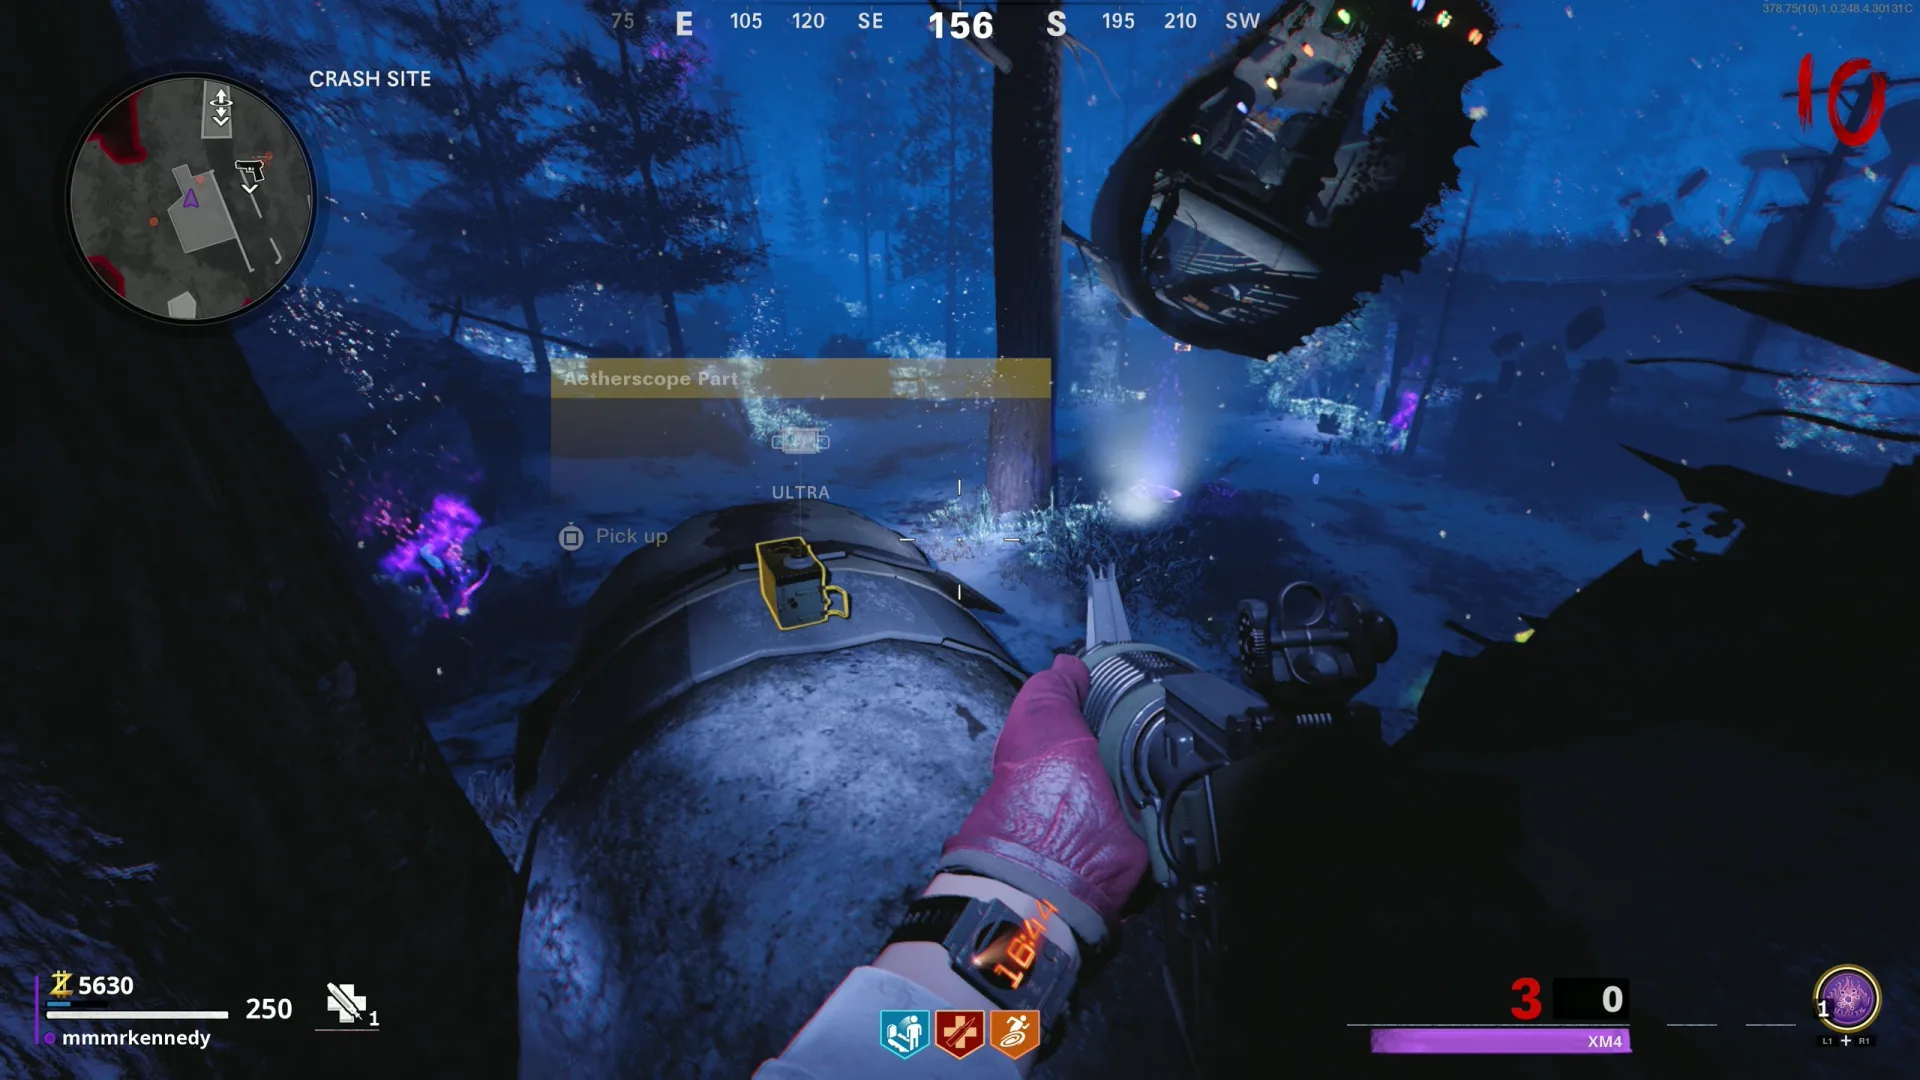
- Enter a Dark Aether anomaly and collect the Aetherscope’s three parts. Only one is visible at a time, so cycle the locations if the first is empty: beneath the concrete Yard staircase; on the crashed plane near its cockpit; and beside the lowest Particle Accelerator Aether Tunnel. Pickups summon Plaguehounds. Build the scope at the workbench behind the Pack-a-Punch platform.
An empty location usually means a different part is currently active. These are three fixed locations with a changing pickup order, not a random search across the map.
Aetherscope: under the Yard staircase Aetherscope: climb onto the broken plane Aetherscope: beside the accelerator’s lower tunnel - Use the new Medical Bay anomaly, take Vogel’s diary beside the upstairs computer, then visit the blue wisps in this order: behind Speed Cola in Medical Bay; between the trial stations in Control Room; in front of the Aetherscope workbench. Interact once to reveal a reflection and again to hand over the diary. You can move to the next after handing it over without waiting through the speech.
The diary sits next to the Medical Bay computer First reflection: behind Speed Cola Second reflection: Control Room trial stations Third reflection: Aetherscope workbench - After returning to the normal world, interact with the upstairs Medical Bay computer to enter the learned password. The hanging chamber powers up, and the quest-specific portals needed for the fire and electric upgrades can now appear. If an upgrade object is missing, check this computer interaction before advancing rounds.
Use this computer after giving all three reflections the diary
All four D.I.E. upgrades — exact routes
- Cryo-Emitter: fire the D.I.E. at the small wooden box on Nacht’s Penthouse ledge. Collect the fallen flask beside the building at Pond. Bait a Megaton’s ranged blast into the fungus on the Pond tree until it glows purple, then place the flask beneath it. After it fills, take it to the chained crate in Medical Bay, pour it on the chains and collect the upgrade.
The tree can be charged earlier while a Megaton is available. Allow roughly a minute for the placed flask to fill; an empty flask will not open the crate.
Shoot this Penthouse ledge box down with the D.I.E. Bait a Megaton blast into this Pond-tree growth Use the filled flask on the chained Medical Bay crate - Nova-5: from Nacht’s Mezzanine, use D.I.E. suction on the canister on the unreachable shelf, then pick it up when it lands. Put it in the Weapons Lab cleaning unit downstairs and kill a Plaguehound immediately beside it. Once the gas has been collected, take the canister to the vine-covered Crash Site crate, place it and melee it to dissolve the vines.
Pull this canister toward you with alternate fire Weapons Lab: kill the Plaguehound next to the installed canister Crash Site: place and break the filled canister on this crate - Thermophasic: after the scope and diary computer, enter the Pond anomaly specifically. In the Dark Aether, go beneath the floating plane at Crash Site and break the small fuse-box cover beside the tunnel to collect its fuse. Install it in the Weapons Lab plasma cutter. After returning to the normal world, climb onto the truck at Pond and take the fire upgrade from its newly opened crate.
Use the Pond anomaly for the fire-upgrade route The small fuse box beneath the lifted plane Install the fuse at the Dark Aether plasma cutter Collect Thermophasic from the Pond truck crate in the normal world - Electrobolt: use the anomaly on the lowest level of the Particle Accelerator after completing the diary computer. With the base Shockwave’s suction, absorb one yellow crystal’s energy, return to the lower accelerator crate and fire the stored charge into it. Repeat for the crystal near Juggernog at Crash Site, beside the Pond Mystery Box, and near Wunderfizz on the Penthouse. All three crate lights must glow before you can take the upgrade.
Carry one charge at a time and do not spend it shooting enemies. Multiple Dark Aether visits are fine. Return to the base Shockwave if a different variant will not absorb the energy.
The lower Particle Accelerator anomaly enables the electric crystals Electric crystal: Crash Site beside Juggernog Electric crystal: Pond near Mystery Box Electric crystal: Penthouse near Wunderfizz Deliver each stored charge to this lower accelerator crate
D.I.E. port and upgrade reference Open helper
Match the chamber port to its real photograph. Reveal its weapon, upgrade route and prerequisites.
Select a port photograph to see the matching element and its complete upgrade route.
Inputs are shared with the inline guide on this device. Photos: mmmrkennedy · game imagery: Activision / Treyarch.
Charge the chamber and reconstruct Orlov
- Shoot each hanging Medical Bay chamber port with its corresponding D.I.E. variant. Use the photographed ports in the helper: Cryo for blue, Nova-5 for green, Electrobolt for yellow, Thermophasic for orange. A correct hit raises that arm into the chamber. Switch variants at their crates and repeat until all four arms rise.
The arm movement is the completion cue. Screen lighting can change the perceived color: match the port photograph and weapon rather than assuming every yellowish port takes fire.
- Enter the new Medical Bay anomaly and interact with the reflection on the upstairs walkway. After its scene, return to the normal world and pick up the Dark Aether Wrench where it stood. Use the wrench on the Yard tank three times, kill the zombie emerging from its hatch, then throw a Semtex into or onto the open hatch. The tank fires at a tree near Crash Site. Carry the dropped Decontamination Agent back to the socket beside the Medical Bay computer.
The heavy Agent prevents sprinting and mantling. Open and clear the return route first. If you drop it and it disappears, check its original tree location.
Collect the wrench after the walkway reflection Repair the tank, kill its occupant and explode the open hatch The tank shot drops this Decontamination Agent at Crash Site Carry the Agent back to this Medical Bay receptacle - Split a fresh Megaton and lead both halves beneath the hanging chamber. Let the machine pull them up one at a time; do not kill them. Bring every player into the upstairs computer room and activate the computer to begin decontamination. Survive the follow-up enemies and let Orlov’s dialogue finish.
If the computer will not start, check that two enemies are inside and all players are in the observation room. A single captured half is insufficient.
Lure both split Megaton enemies beneath the open chamber
Orlov defense and the escape route
- Resupply armor, ammo, perks and your damage weapon before the last reflection. Enter the Nacht Living Room anomaly, find Orlov’s reflection in Nacht near the M1911 wall-buy and listen. In the normal world, pick up the family photograph he leaves to begin the final encounter.
Picking up the family photograph commits the team to the finale. Have everyone ready before that pickup.
Nacht: the final anomaly leads to Orlov’s family-photo scene - In the accelerator, clear enemies attacking Orlov while he disables three systems. He is not a killable escort NPC, but attackers pause his work. Use the open floor to keep the horde moving, prioritize nearby Megatons and Plaguehounds, and leave ammunition drops until you can use them. There is no benefit to abandoning him to chase distant enemies.
- When shutdown finishes and the escape countdown appears, leave via Weapons Lab → Control Room → Tunnel → Crash Site → Pond. Avoid the bright electrical columns and arcs; touching them is lethal. At Pond, reach and interact with the helicopter before the HUD timer expires. This ending requires boarding the helicopter, not merely finishing Orlov’s defense.
The final escape is a route through electrical hazards, not a normal kill-every-enemy exfil. Keep moving and use the gaps you can actually see.
Side Quests
Coffin dance — free Juggernog and a loot chest
- After assembling Pack-a-Punch, shoot five small blue lights in the Particle Accelerator. They are tiny, so stop at each photograph’s sightline and use an ordinary precise weapon. The fifth sends the team into the dance scene; after returning, open the chest for a Juggernog bottle, salvage and a random weapon.
The weapon is random; a Ray Gun or D.I.E. is possible, not promised. Save the free Juggernog bottle for someone who still needs it.
Orb 1: machinery near the right-hand route to Main Power Orb 2: through the lower barrier beneath the stairs Orb 3: high air duct by Weapons Lab Orb 4: behind the Main Power wall grate Orb 5: behind equipment below the Arsenal
Free Legendary rarity — Medical Bay hand trap
Alone — three cassette tapes
- Hold interact on the three tapes: inside the overturned refrigerator in Nacht’s Living Room; on the Medical Bay shelf; and on the machinery in Particle Accelerator. The third starts Alone. These pickups are separate from Vogel’s diary.
Alone tape: overturned Living Room refrigerator Alone tape: Medical Bay shelf Alone tape: accelerator machinery
Floating zombies — scorestreak or jumpscare
- In the Dark Aether after Pack-a-Punch, find the suspended zombie at one of five sites and shoot it to move it to the next. Search the accelerator barrier toward Weapons Lab, water below Control Room’s Medical Bay walkway, Pond trees beside the Tunnel door, crashed plane tail, and Yard trees left of the Living Room entrance. The order changes; continue through all five.
Floating-zombie site: accelerator barrier toward Weapons Lab Floating-zombie site: below the facility walkway Floating-zombie site: Pond trees Floating-zombie site: plane tail Floating-zombie site: Yard trees - Find the final suspended zombie over the center of Pond. Shoot it for a scorestreak drop, or stand underneath without shooting to trigger the jumpscare instead. If the Dark Aether visit ends mid-route, resume on a later visit.
Final floating zombie: choose the reward shot or walk beneath it
Satellite dishes — free 1,500 Essence
- Apply Dead Wire to a weapon. Shoot the three distant satellite dishes until each points toward the Nacht Penthouse antenna and emits a pulse: one left of Stamin-Up as seen from Crash Site, one behind Juggernog among the trees, and one right of Quick Revive beyond Pond. When all align, collect the three Essence containers near Penthouse Wunderfizz.
All three dishes must face this Penthouse antenna
Intel, extra reflections and the distant giant
- Collect loose documents and audio logs, listen to Requiem/Omega radios on later rounds, collect enemy-dropped documents and use Trials marked for Intel. The Aetherscope also reveals optional reflections beyond the three diary scenes. For collectible completion, use the linked checklist to distinguish fixed pickups from repeatable radio and trial rewards.
Die Maschine Intel locations ↗ · Additional spectral-reflection locations ↗
- On round 42 or later, visit the Dark Aether and look into the forest beyond Pond for the distant giant. This is an environmental sighting; it does not unlock an additional boss or replace the main quest.
Sources and review
Original walkthrough cross-checked against the community and illustrated references below on 3 October 2026. Gameplay photographs: mmmrkennedy; game imagery: Activision / Treyarch. Match-specific numbers and sequences must come from your game. Source and software checks are complete; a full in-game walkthrough has not been performed.
- r/CODZombies community guide ↗
- r/CODZombies community guide (2) ↗
- mmmrkennedy illustrated guide (3) ↗
- COD Zombies Guides illustrated walkthrough (4) ↗
Select any reference image to enlarge it. Screenshot and symbol sources are credited in the linked walkthroughs; this guide uses local copies for reliable access.